")

Your garage doesn’t have to stay a dumping ground for everything that doesn’t fit inside your house. Transform it into a functional workspace with these weekend-friendly projects that won’t drain your wallet.
Start with garage decluttering before installing a single shelf. Sort everything into keep, donate, and trash piles. You’ll be surprised how much space you reclaim simply by purging broken tools, dried-up paint cans, and duplicate items cluttering your floor.
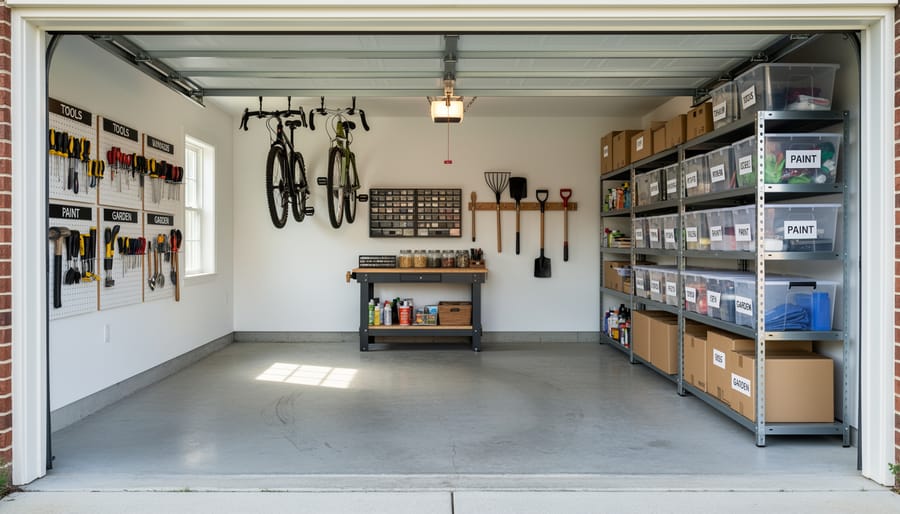
Build vertical storage using simple pegboard systems and sturdy shelving units. Most homeowners waste prime wall space while their floors overflow with boxes and equipment. A basic 8-foot pegboard costs around $30 and holds hundreds of pounds when properly mounted to studs.
Zone your garage by activity rather than just cramming things wherever they fit. Create dedicated areas for gardening supplies, sports equipment, seasonal decorations, and automotive tools. This approach, recommended by professional organizers we surveyed in 2026, cuts retrieval time in half and keeps similar items together.
The best part? These projects require minimal skills and basic tools most people already own. You don’t need to be a master carpenter or spend thousands on custom cabinet systems. Clear bins, labeled containers, and clever use of overhead space will revolutionize your garage in just a few days of focused effort.
Assess Your Garage Space and Storage Needs
Before you build a single shelf or buy any bins, take an honest inventory of your space. Most garage clutter happens because we skip this step and jump straight to Pinterest-worthy solutions that don’t actually fit our needs.
Start by completely emptying one section at a time. Yes, it’s tedious, but you can’t assess what you have if half of it’s buried behind boxes you haven’t opened since 2023. As you pull things out, create three piles: use regularly (at least monthly), use seasonally, and haven’t touched in over a year. That third pile? It’s either trash, donation, or genuinely valuable storage that belongs elsewhere in your home.
Next, grab a tape measure and sketch a basic floor plan. Note where your garage door tracks run, electrical outlets sit, and windows provide light. Measure wall heights and mark any obstructions like water heaters or electrical panels. These measurements determine what storage solutions will actually fit and where they can safely go.
Now map out functional zones based on what you kept. Park your car (if that’s the goal) and mark where you need clear floor space. Do you need a workshop area? Measure out a realistic workbench footprint, not the eight-foot monster you saw online if you only have four feet of available wall. Designate specific zones for categories: sports equipment near the door for quick access, seasonal decorations overhead where you’ll reach them twice a year, gardening supplies near the side door.
Take photos of each wall and your floor plan. When you’re browsing materials or planning projects, these references keep you grounded in reality. A gorgeous DIY shelving unit means nothing if it blocks your car door or covers your only outlet.
Budget-Friendly DIY Storage Solutions You Can Build This Weekend
Wall-Mounted Pegboard Systems
Pegboard remains one of the most versatile and affordable DIY garage organization solutions you can install in a weekend. A standard 4×8 sheet costs around $20-30 at most home improvement stores, and you can customize it endlessly as your needs change.
Start by attaching 1×2 furring strips horizontally to your wall studs every 16 inches. These create the crucial gap pegboard needs for hooks to fit through the holes. Mount the pegboard to these strips using 1.5-inch screws, making sure you hit the furring strips, not just the drywall. For concrete walls, use masonry anchors instead.
The real power comes from strategic hook placement. Group frequently-used tools at eye level, and arrange them by task rather than type, keep all your painting supplies together, all your measuring tools together. This task-based organization cuts your project prep time in half.
Double your capacity by installing pegboard in an L-shape around a corner, or run it floor-to-ceiling in a narrow section between your garage door and workbench. Paint the pegboard a light color before mounting to increase visibility, and outline each tool with a marker so you’ll instantly notice what’s missing. Replace basic metal hooks with specialized attachments like bin holders and magnetic tool strips as your budget allows.
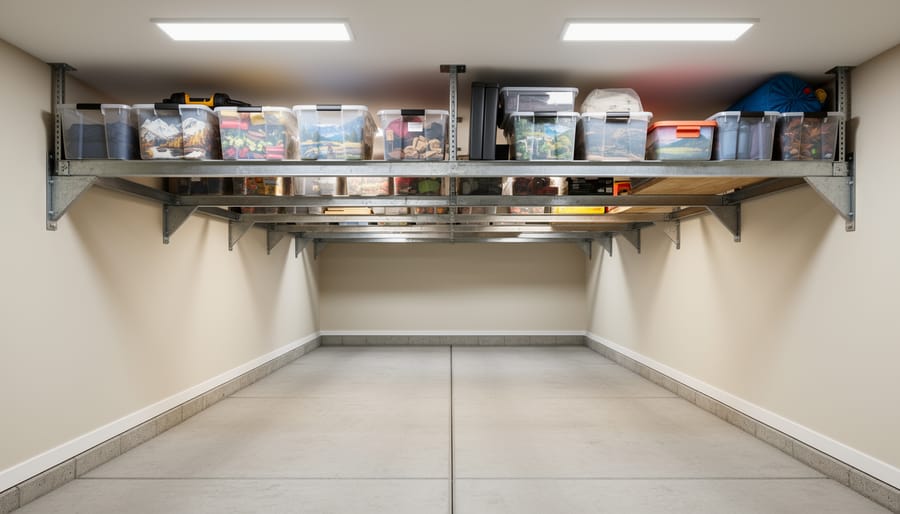
Overhead Storage Racks
Overhead racks transform wasted ceiling space into valuable storage for holiday decorations, camping gear, and other items you only need a few times a year. Most garages have at least four feet of unused vertical space above parked cars, perfect for sturdy platforms that keep bulky bins off the floor.
Build a simple rack using 2×4 lumber secured directly into ceiling joists (never drywall alone). Locate joists with a stud finder, mark their positions, and mount heavy-duty lag bolts every 16 inches for maximum weight distribution. A basic 4×8-foot platform costs around $50 in materials and handles up to 600 pounds when properly anchored.
Before installing any ceiling storage, review overhead storage safety guidelines, including clearance requirements above vehicle hoods and proper load limits for your ceiling structure. Leave at least 12 inches between the platform bottom and your car’s roof to prevent scrapes when parking.
Label all overhead bins clearly on their sides (not tops) so you can identify contents without climbing a ladder. Store only lightweight seasonal items up high, save heavier equipment like power tools for lower, more accessible spots.
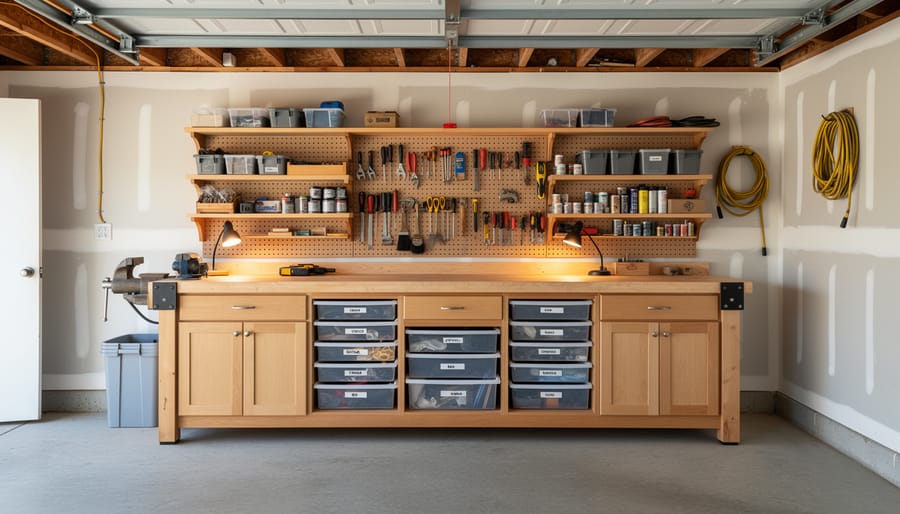
DIY Workbench with Built-In Storage
A solid workbench transforms your garage into a functional workspace where you can tackle projects comfortably. Start with a simple frame using 2×4 lumber for the legs and supports, topped with a sheet of three-quarter-inch plywood or an old solid-core door for the work surface. Mount the bench at 36 inches high for comfortable standing work, securing it directly to wall studs for stability.
Build storage directly into your design rather than adding it later. Add a lower shelf between the legs using another plywood sheet, perfect for storing power tools and paint cans. Install simple drawer boxes made from one-by-six pine boards beneath the work surface, using basic drawer slides from the hardware store. These drawers keep screws, nails, and small parts organized and within arm’s reach.
For even more guidance on building your workspace, check out detailed DIY workbench plans that include cut lists and assembly steps. Mount a pegboard backsplash above the bench to hang frequently-used hand tools, and consider adding a power strip along the back edge for easy access to outlets. This entire project costs roughly 75 to 150 dollars in materials and takes a weekend to complete.
Repurposed Storage Ideas
Before you head to the hardware store, take a quick inventory of materials you might already have or can pick up for next to nothing. Free or discarded wooden pallets make excellent lumber for DIY garage organization shelving, just dismantle them and reassemble the planks as shallow shelves for paint cans, automotive supplies, or gardening pots. Sand the wood lightly to avoid splinters, then mount the shelves with basic L-brackets. For smaller tools and accessories, cut PVC pipes into short sections and mount them horizontally on a plywood backing to create custom holders for everything from screwdrivers to spray bottles. Old kitchen cabinets destined for the landfill work beautifully for workshop storage; mount them on garage walls to hide clutter behind closed doors. Mason jars screwed to the underside of a shelf become transparent storage for nails, screws, and washers, while retired ladders lean against the wall to hold bikes or long-handled garden tools on their rungs. The key is matching the material’s strength to what you’re storing, reclaimed wood handles light to medium loads, while metal components from old furniture can support heavier items.
Smart Zoning: Creating Functional Areas in Your Garage
The secret to a functional garage isn’t buying more storage containers, it’s defining clear zones before you organize anything. Most garages try to serve as workshop, parking area, sports locker, and garden shed all at once, creating chaos when everything overlaps. Dividing your space into dedicated zones solves this problem and makes it easy to find what you need when you need it.
Start by mapping your garage on paper and identifying your primary uses. A typical two-car garage can accommodate four to five zones, such as a parking zone (obviously), a workshop or project area, a sports and recreation zone, a seasonal storage section, and a garden supply station. The key is sizing each zone based on actual usage, not aspirational habits, if you never do woodworking, don’t dedicate prime real estate to a workshop.
Mark zones physically on the floor using painter’s tape or chalk to test the layout before committing. Your parking zone needs at least 18 inches of clearance on each side of the vehicle for comfortable door opening. The workshop area works best along a wall with access to power outlets, while the sports zone thrives near the main entry for quick grab-and-go access. Seasonal items and garden supplies can occupy harder-to-reach spaces like overhead areas or deep corners since you won’t access them daily.
Once you establish zones, keep everything within its designated area, bikes in the sports zone, fertilizer with garden supplies, tools in the workshop space. This discipline prevents the slow creep back to chaos and makes maintenance straightforward.
Affordable Materials and Tools for DIY Garage Projects
Smart DIY garage organization doesn’t require spending hundreds at specialty stores. You can source quality materials for a fraction of retail prices if you know where to look.
Start with big-box retailers like Home Depot and Lowe’s for lumber, brackets, and basic hardware. Their “cull lumber” sections often have perfectly usable pieces at 50-70% off just for minor cosmetic imperfections. Menards and Harbor Freight offer budget-friendly tool options that work perfectly for occasional DIY use. Check their weekly ads in 2026 since garage storage materials frequently go on sale during spring and fall.
Facebook Marketplace and Craigslist have become goldmines for garage organization materials. Search for “moving sale,” “garage cleanout,” or “scrap wood” to find free or cheap pallets, shelving units, and metal racks. Local salvage yards and Habitat for Humanity ReStores stock reclaimed lumber, cabinets, and hardware at bargain prices. One community member scored six industrial shelving units for $40 total at a warehouse liquidation sale.
For tools, you’ll need just the essentials for most projects: a cordless drill, level, tape measure, stud finder, and circular saw. Rent expensive tools like a miter saw from Home Depot for $30 per day rather than buying. Ryobi and Craftsman offer reliable starter tool kits under $150 that handle basic garage projects.
Buy fasteners and small hardware from dollar stores or online bulk suppliers instead of paying premium prices at hardware stores. A box of 100 screws costs $12 at big-box stores but just $4 on Amazon.
Vertical Space Strategies That Double Your Storage
Your garage walls and ceiling represent the most underutilized real estate in your space. By going vertical, you can easily double your storage capacity without sacrificing floor area for parking or workspace.
Start with vertical storage systems like slatwall or track-mounted rails. These adjustable systems let you reconfigure hooks and baskets as your needs change. A standard 4×8-foot slatwall panel costs $40-60 and can hold up to 75 pounds per square foot when properly anchored into studs. Install them along one full wall, from about 3 feet off the ground to within a foot of the ceiling.
Heavy-duty hooks are your best friend for bulky items. J-hooks work perfectly for bikes (40-pound capacity each), while utility hooks handle ladders and garden tools (50-pound capacity). Space hooks 16 inches apart to match stud placement for maximum strength. For lighter items like extension cords and hoses, magnetic strips mounted on metal surfaces provide quick-grab access without drilling.
Overhead ceiling racks transform wasted space above your car into prime storage territory. Most ceiling-mounted racks handle 300-600 pounds when installed into ceiling joists. Keep frequently-used items at eye level and seasonal storage overhead. Always leave 12-16 inches of clearance between your vehicle’s roof and stored items to prevent accidental bumps.
For garages with limited wall access, corner shelving units and behind-door organizers capture awkward spaces that would otherwise sit empty.
Common DIY Garage Organization Mistakes to Avoid
Don’t let avoidable errors derail your garage transformation. Many enthusiastic DIYers buy dozens of storage bins and containers before removing a single item, only to realize they’ve wasted money on solutions that don’t fit their actual needs. Start by purging ruthlessly first, then measure what remains and buy storage accordingly. Another frequent mistake is ignoring weight capacity ratings on shelves and overhead racks. That heavy toolbox might look fine on your new shelf today, but exceeding load limits creates serious safety hazards and eventual collapse.
Blocking access to electrical panels, water shutoffs, or garage door mechanisms happens more often than you’d think when people get excited about maximizing every inch. Leave clear pathways to essential utilities and ensure your car doors can still open fully. Choosing Instagram-worthy matching containers over functional design is tempting, but those sleek acrylic bins won’t survive garage temperature swings or hold bulky items efficiently. Finally, many people install fixed shelving before considering how their needs might change. Adjustable systems cost slightly more upfront but adapt as your hobbies, vehicles, and storage requirements evolve over the years.
Maintaining Your Organized Garage Long-Term
The best-organized garage in 2026 won’t stay that way without consistent long-term organization habits. Set a recurring calendar reminder for a 15-minute quarterly review where you assess what’s working and what needs adjustment in your DIY garage organization setup. During these check-ins, remove items you haven’t touched in six months, tighten any loose pegboard hooks or shelving brackets, and sweep out accumulated dust and debris.
Adopt the “one in, one out” rule immediately: before bringing any new equipment, tools, or storage bins into your garage, remove something of equal size. This simple practice prevents the gradual creep of clutter that undermines even the most thoughtful storage systems.
Create a designated “decision zone” near your garage entrance for items that don’t have an assigned home yet. Every Sunday evening, spend five minutes sorting this holding area, either find permanent spots for these items, donate them, or discard them. Your future self will thank you for making maintenance a quick routine rather than an overwhelming weekend project, and you’ll protect the time and money you invested in your DIY storage solutions.
Transforming your garage doesn’t require a massive budget or professional-level carpentry skills. The DIY garage organization projects we’ve covered prove that a weekend, some basic tools, and a clear plan are all you need to reclaim your space. Whether you tackle a simple pegboard wall this Saturday or build overhead storage next month, each project moves you closer to a garage that actually works for your life.
Start with the one area causing you the most frustration, maybe it’s tripping over garden tools or never finding your drill when you need it. Build that solution, see how it feels, then move on to the next zone. And when you finish a project, snap a photo and share it with the Designers Raum community. Your creative approach might inspire someone else’s breakthrough, and that’s how we all get better at making our homes work harder.
Comment here